How to Print Labels


Printing labels may seem challenging initially, but it can become simple with a careful eye and the right approach. By following these steps, based on the most asked questions from our customers, we'll ensure that your labels are precise, professional, and perfectly aligned every time.
How to Prepare Before Printing Labels
Before deciding on the labels to print, it's essential to consider the type of labels you need and the design you want to apply. One option we offer is blank labels, which are ready to print at home. These labels come in various materials, including weatherproof, pastels, and fluorescents, and are available in a large selection of shapes and sizes.
However, if you prefer labels already printed with your design, we also offer custom labels through our website. This selection includes our most used materials, like white gloss, clear, and weatherproof. This service is ideal for companies requiring larger print runs, as it is supported by our team of experts committed to producing high-quality labels.
If printing your labels is the right choice for your project, you'll need to learn how to print correctly. This guide covers everything you need to know, from purchasing the correct labels to getting the perfect prints.
Determine How Many Labels Are Needed
Determining the right amount of labels needed can be challenging, especially when a business is just starting. However, to print the right amount of blank or custom labels, one must consider four different factors:
Purpose and Duration:
- Short-term use: determine the durability of your products, whether they are used for events or limited-time products.
- Long-term use: for ongoing use, consider average monthly or yearly needs. If you know you'll have a consistent need for label printing, bulk purchases can save you time and money.
Label Application and Design Changes:
- Printing rate: calculate the number of products or items that will need labeling over your specified period and account for any expected growth in production or sales rates.
- Design changes: consider potential updates in design or information changes that the products might face over time.
Printing Costs:
First determine how many labels your products will need and calculate how much it will cost with additional fees. Here's a simple breakdown of calculating how many labels you may need for a project:
Estimated Demand:
Monthly demand: 1,000 units
Planning period: 6 months
Total labels needed: 1,000 units x 6 months = 6,000 labels
Include Buffer:
Estimated waste: 5%
Buffer amount: 6,000 labels x 5% = 300 labels
Final Order Quantity:
Total labels to print: 6,000 labels + 300 labels = 6, 300 labels
Choose the Right Label for your Product
Before creating your label, you must comprehensively know the different dimensions and sizes your product needs. Below are a few considerations to make when choosing a label.
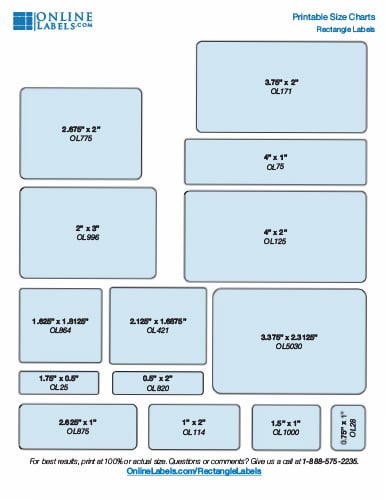
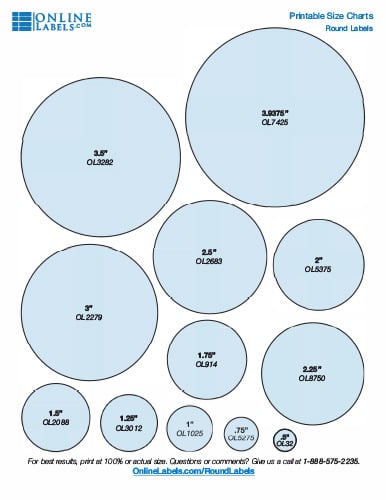
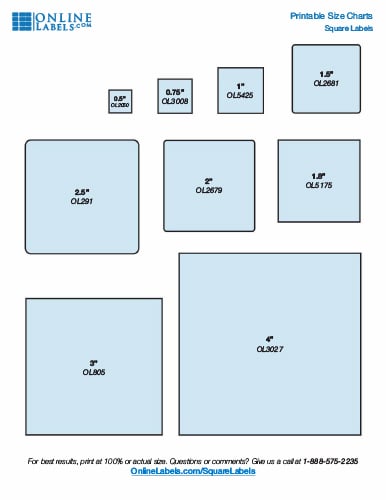
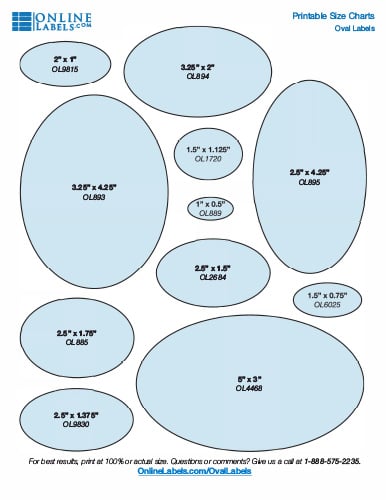
Size and Shape Specifications:
The size of your label can play a crucial role in enhancing visual appeal and ensuring that all necessary information is legible and effectively communicated. Use our label size guides below to find the right label size. Print and cut the sizes and place them on your surface to give you an idea of how a label will fit.
Designing Your Label
Printing a label that stands out requires more than a catchy logo or a vibrant color palette. The secret to eye-catching and well-printed labels lies in their design structure, particularly in how you align and space each element. Here are specific rules to follow when designing label templates with perfect alignment and spacing.
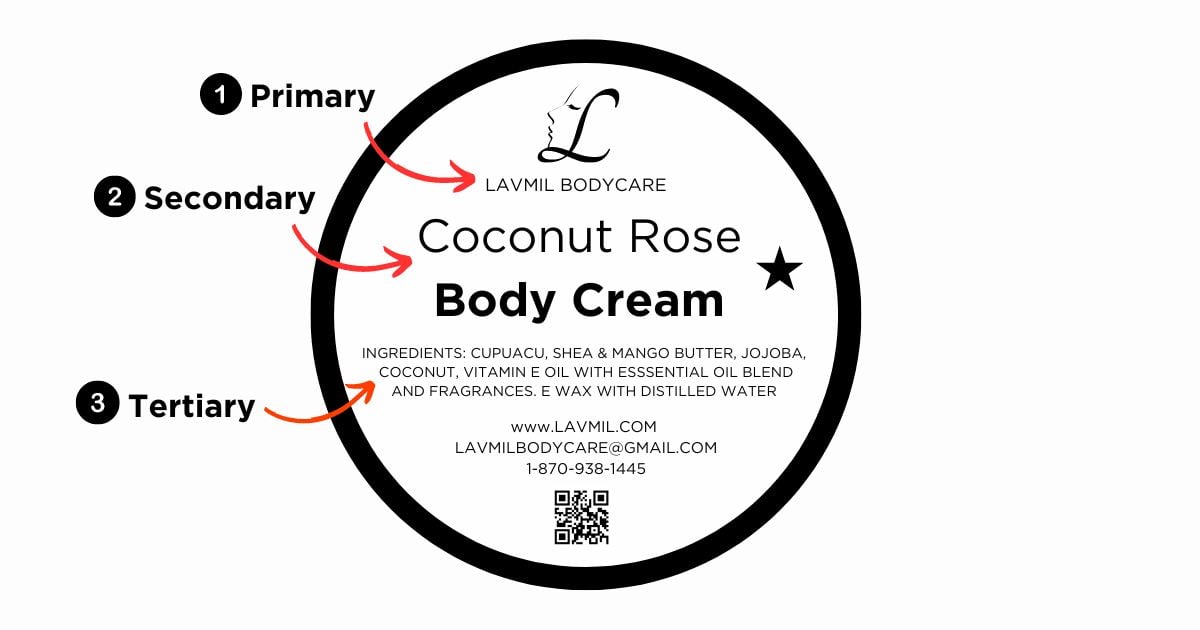
- Start with a Clear Hierarchy
Before creating a design, establish a clear hierarchy of the elements in the label. A label has three parts: primary, secondary, and tertiary information, and it's up to the business owner to explain how to design it. For instance, the brand name might be primary, the product name secondary, and additional details like weight and ingredients tertiary.
This hierarchy will guide your alignment and spacing choices.
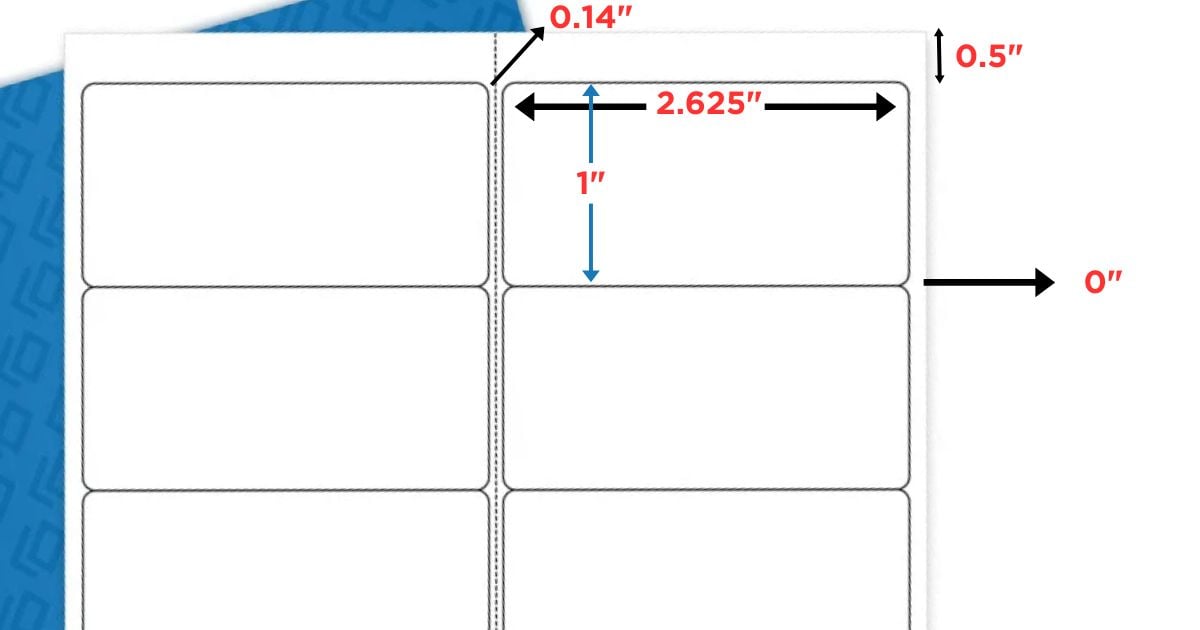
- Accounting for Safe Margins and Proper Bleed
Before you print your labels, you can minimize the risk of misalignment by setting up proper bleed and safe margins. Bleed refers to the area around your label's die-line that designs should extend past to ensure they are not cut off. Full-color backgrounds should be extended around the edges of a label.
- Consistent Spacing and Visual Anchors for Cohesion
Aside from margins, focusing on spacing is critical to a cohesive design. Utilizing equal spacing between similar elements, such as visual anchors, can help draw the spectator's eye to the design. These elements can include borders, lines, or contrasting blocks of color that can help define sections and produce unity.
Design tip: Once all the elements in a design are correct, print a mockup to see how it looks in real life. This will help you see if the result creates a seamless experience for the audience and allow you to make any necessary changes before you print your labels.

Setting Up Your Printer
It's time to prep your printer once your design is ready to print. Check your printer settings for the following before clicking print:
- Page scaling: set your printer page scaling to 100% or "Actual Size." This will allow your labels to print at your desired size.
- Loading label paper: it may sound straightforward, but loading your label sheet incorrectly into your printer can lead to misalignment. First, ensure your sheet is facing the right direction. Most printers include an indicator on the tray telling you which direction to place the labels. Some materials, like our weatherproof polyester laser, may also require you to feed labels manually into the tray to avoid static buildup.
- Adjust your printer paper setting: depending on your material, you may need to change the paper type from your printer dialog box. This guide will help you find the right printer paper setting for your label material.
Handling Your Labels After Printing
Handling labels carefully can help you avoid smearing and loss of adhesive properties. Follow these guidelines for best results:
- Clean hands: wash your hands and keep them clean before applying your label. Ensure the labels are peeled gently to prevent tearing or damage to the edges.
- Apply carefully: place your container on a smooth, flat surface and apply your label from the middle. Work your way around to the outside of the label, smoothing out any bubbles along the way.
Quality Control
After applying labels, a quality control check must be done to ensure each label is aligned with the products. Implement these checks:
- Inspection: visually inspect each labeled product for alignment and design.
- Adhesion test: gently rub the edges of the label to ensure they are fully adhered and not peeling.
Achieving Flawless Label Printing
Label printing can be a simple yet strategic process. Paying attention to the details and following the steps outlined can help achieve professional, precise, and perfectly aligned labels every time. Remember, the quality of your labels reflects the quality of your products, so investing time and effort into your printing process can help enhance the brand's image and operational efficiency.
