How to Create Mail Merge Labels in Word 2003-2019 & Office 365

When you need to print a large number of address labels, it can be tedious and time consuming to enter each person's information on your label sheet manually.
Fortunately, Microsoft Word offers the mail merge feature to help users complete this process much faster. Mail merge is a popular tool for mass producing custom or personalized items but many people are unfamiliar with the term and unsure of how to utilize it for their projects.
In the following article, we tackle some frequently asked questions related to mail merge and step-out how to create mail merge labels in every version of Microsoft Word. These tips will help with creating address or return address labels for business letters, company invoices, wedding invitations, name tags, and more.
Mail Merge Frequently Asked Questions
Here are answers to the internet's most searched questions on the topic.
What is mail merge?
A mail merge (or data merge) is a method of auto-inserting data. It takes the time and effort out of creating personalized content. A number of programs offer a mail merge tool to help with address labeling, name tag creation, certificate printing, email personalization, and more.
How does mail merge work?
The mail merge functionality pulls the information from a list of data. It then inserts the appropriate fields into your document, design, email, etc.
What programs offer label mail merges?
Dozens of standard programs offer mail merge, but the most common for label mail merges are Maestro Label Designer and Microsoft Word.
Is mail merge free?
Mail merge in most programs is a free tool. It's included free in both Maestro Label Designer and Microsoft Word.
How do you create a data list for mail merge?
We explain this process below in Step 1: Create your data list.
What file formats are needed for mail merge?
Maestro Label Designer and Microsoft word accept .csv, .txt, .xls, and .xlsx file formats. Microsoft Word also accepts Outlook and Apple contact lists.
Step 1: Create your data list
Before Microsoft Word 2007 can auto-fill your labels, it has to access your data. If you already have your data set, move on to Step 2. If not, follow the below instructions for how to create a mail merge data list in Microsoft Excel.
- Launch Microsoft Excel.
- Title each column based on the data you'll be adding. If you're making address labels, for example, you may want to use the following column titles: first name, last name, address 1, address 2, city, state, zip.
- Add your data to each row and column.
- Select "Save As" from the File menu in the top left-hand corner.
- Give your document a name. Example: Wedding Invitation Address List.
- Expand the dropdown for the "Save as type" option.
- Choose any of the following formats: CSV (Comma delimited)(recommended), Text (Tab delimited), Excel Workbook, or Excel 97-2003 Workbook.
- Click "Save". If you get any warning pop-ups, click "OK" and/or "Yes."
- Close your document along with Microsoft Excel and continue to Step 2.
Step 2: Launch the mail merge wizard
Microsoft Word has a wizard that will walk you through the process from start to finish. Use the links below to jump to your version of MS Word then follow along with our directions while running the wizard.
Don't have your labels yet? Shop OL875, our most popular address label configuration, or browse all of our address label products.
Microsoft Word 2003 Mail Merge
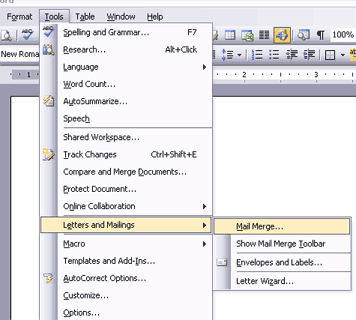
- Open the "Tools" menu.
- Click into "Letters & Mailings."
- Select "Mail Merge."

- Choose "Labels" then hit "Next: Starting document."
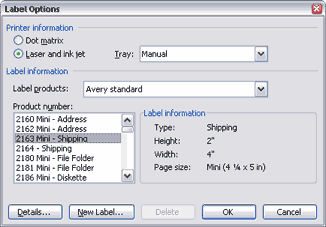
- Choose "Avery US Letter" from the second dropdown list and find the comparable Avery® labels product number from our cross-reference chart or choose "New Label" to manually enter the label specs. Get in-depth instructions on creating a Microsoft Word template. Note: If you're using an OnlineLabels.com product, that information is available under the "Product Specifications" heading on each product page.

- Click "OK."
- Ensure "Use an existing list" is selected and click "Next: Arrange your labels."
- Find your data set from Step 1 and click "Open."
- Review the data in the next pop-up and click "OK."
- Click "Next: Arrange your labels" again.
- Move your cursor to the first label on your screen. Click "Address block" if you're creating address/return address labels and select your preferred formatting in the pop-up (use the preview pane to choose the best option for your data). If you're making another type of document, use the "Insert Merge Files" button in the "Mailings" tab. Be sure to add spaces, commas, etc if you're creating your own layout.
- Hit the "Update all labels" button and then "Next: Preview your labels."
- Check that your data copied over correctly and you're happy with the final result.
- Click "Next: Complete the merge."
- Close the wizard and save your document.
Microsoft Word 2007 Mail Merge
- Open on the "Mailings" tab in the menu bar.
- Click "Start Mail Merge."

- Select "Step by Step Mail Merge Wizard."
- Ensure "Change document layout" is selected and click "Next: Select recipients."
- Choose "Avery US Letter" from the second dropdown list and find the comparable Avery® product number from our cross-reference chart or choose "New Label" to manually enter the label specs. Get in-depth instructions on creating a Microsoft Word template. Note: If you're using an OnlineLabels.com product, that information is available under the "Product Specifications" heading on each product page.

- Click "OK."
- Optional: Click into the "Layout" tab and select "View gridlines" to see the outline of your labels on-screen.
- Ensure "Use an existing list" is selected and click "Next: Arrange your labels."
- Find your data set from Step 1 and click "Open."
- Review the data in the next pop-up and click "OK."
- Click "Next: Arrange your labels" again.
- Move your cursor to the first label on your screen. Click "Address block" if you're creating address/return address labels and select your preferred formatting in the pop-up (use the preview pane to choose the best option for your data). If you're making another type of document, use the "Insert Merge Fields" button in the "Mailings" tab. Be sure to add spaces, commas, etc if you're creating your own layout.
- Hit the "Update all labels" button and then "Next: Preview your labels."
- Check that your data copied over correctly and you're happy with the final result.
- Click "Next: Complete the merge."
- Close the wizard and save your document.
Microsoft Word 2010 Mail Merge
- Open on the "Mailings" tab in the menu bar.
- Click "Start Mail Merge."

- Select "Step by Step Mail Merge Wizard."
- Ensure "Change document layout" is selected and click "Next: Select recipients."
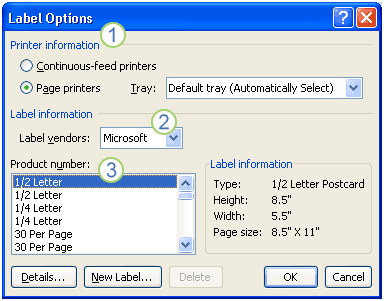
- Choose "OnlineLabels.com" from the second dropdown list and find your label product number in the list.
- Click "OK."
- Optional: Click into the "Layout" tab and select "View gridlines" to see the outline of your labels on-screen.
- Ensure "Use an existing list" is selected and click "Next: Arrange your labels."
- Find your data set from Step 1 and click "Open."
- Review the data in the next pop-up and click "OK."
- Click "Next: Arrange your labels" again.
- Move your cursor to the first label on your screen. Click "Address block" if you're creating address/return address labels and select your preferred formatting in the pop-up (use the preview pane to choose the best option for your data). If you're making another type of document, use the "Insert Merge Fields" button in the "Mailings" tab. Be sure to add spaces, commas, etc if you're creating your own layout.
- Hit the "Update all labels" button and then "Next: Preview your labels."
- Check that your data copied over correctly and you're happy with the final result.
- Click "Next: Complete the merge."
- Close the wizard and save your document.
Microsoft Word 2013 Mail Merge
- Open on the "Mailings" tab in the menu bar.
- Click "Start Mail Merge."
- Select "Step-by-Step Mail Merge Wizard."
- Choose "Labels" and click "Next: Starting document."
- Select the "Start from a template" option and click "Next: Select recipient."
- Choose "OnlineLabels.com" from the second dropdown list and find your label product number in the list.
- Click "OK."
- Optional: Click into the "Layout" tab and select "View gridlines" to see the outline of your labels on-screen.
- Ensure "Use an existing list" is selected and click "Browse."
- Find your data set from Step 1 and click "Open." You may also need to select a specific sheet from your document in this step.
- Review the data in the next pop-up and click "OK."
- Click "Next: Arrange your labels."
- Move your cursor to the first label on your screen. Click "Address block" if you're creating address/return address labels and select your preferred formatting in the pop-up (use the preview pane to choose the best option for your data). If you're making another type of document, use the "Insert Merge Fields" button in the "Mailings" tab. Be sure to add spaces, commas, etc if you're creating your own layout.
- Hit the "Update all labels" button and then "Next: Preview your labels."
- Check that your data copied over correctly and you're happy with the final result.
- Click "Next: Complete the merge."
- Close the wizard and save your document.
Microsoft Word 2016 Mail Merge
- Open on the "Mailings" tab in the menu bar.
- Click "Start Mail Merge."
- Select "Step-by Step-Mail Merge Wizard."
- Click "Change document layout" then "Label options."
- Choose "OnlineLabels.com" from the second dropdown list and find your label product number in the list.
- Click "OK."
- Optional: Click into the "Layout" tab and select "View gridlines" to see the outline of your labels on-screen.
- Choose "Next: Select recipients."
- Ensure "Use an existing list" is selected and click "Next: Arrange your labels."
- Find your data set from Step 1 and click "Open."
- Review the data in the next pop-up and click "OK."
- Click "Next: Arrange your labels."
- Move your cursor to the first label on your screen. Click "Address block" if you're creating address/return address labels and select your preferred formatting in the pop-up (use the preview pane to choose the best option for your data). If you're making another type of document, use the "Insert Merge Fields" button in the "Mailings" tab. Be sure to add spaces, commas, etc if you're creating your own layout.
- Hit the "Update all labels" button and then "Next: Preview your labels."
- Check that your data copied over correctly and you're happy with the final result.
- Click "Next: Complete the merge."
- Close the wizard and save your document.
Microsoft Word 2019/Office 365 Mail Merge
- Open on the "Mailings" tab in the menu bar.
- Click "Start Mail Merge."
- Select "Step-by-Step Mail Merge Wizard."
- Click "Change document layout" then "Label options."
- Choose "OnlineLabels.com" from the second dropdown list and find your label product number in the list.
- Click "OK."
- Optional: Click into the "Layout" tab and select "View gridlines" to see the outline of your labels on-screen.
- Choose "Next: Select recipients."
- Ensure "Use an existing list" is selected and click "Next: Arrange your labels."
- Find your data set from Step 1 and click "Open."
- Review the data in the next pop-up and click "OK."
- Click "Next: Arrange your labels."
- Move your cursor to the first label on your screen. Click "Address block" if you're creating address/return address labels and select your preferred formatting in the pop-up (use the preview pane to choose the best option for your data). If you're making another type of document, use the "Insert Merge Fields" button in the "Mailings" tab. Be sure to add spaces, commas, etc if you're creating your own layout.
- Hit the "Update all labels" button and then "Next: Preview your labels."
- Check that your data copied over correctly and you're happy with the final result.
- Click "Next: Complete the merge."
- Close the wizard and save your document.
Extra: Maestro Label Designer
Try Maestro Label Designer to use mail merge functionality with our huge selection of pre-designed label templates.
Maestro Label Designer is an online design program created exclusively for OnlineLabels.com customers. It includes templates for every label size and configuration we offer, in addition to a suite of tools and features like mail merge.
Follow the summarized steps below to begin a mail merge using Maestro Label Designer.
- Select "Mail Merge" in the "Tools" menu.
- Upload your data list.
- Choose how you would like the program to insert your data – as separate fields, one field, or as barcodes.
- Select which fields you'd like to insert using the green arrow.
- Click "Add To Design" to add them to your canvas. They will show up as: <<COLUMN TITLE>>.
- Move your mail merge placeholders into the correct place on your label.
- Choose the "Preview" tab in the top gray bar to remove the placeholder text and view the information in your data list.
- Click the white arrows in the top gray bar to cycle through each label.
- Hit print and enjoy a sheet full of personalized labels!
View more detailed instructions for mail merge in Maestro Label Designer.
Step 3: Print your mail merge labels
Once your document is setup, formatted, and saved, it's time to print!
- Load your mailing labels into the printer.
- Use the "Print" button on the last page of the wizard or go to "File," "Print" to print as normal.
Mail merge is a quick and efficient way to create professional-looking labels and individualized content in no time. Use mail merge for business and personal projects, from return address labels to product barcoding. For more information on how to mail merge labels, call our customer service team at 1-888-575-2235.
You may also want to shop address label sheets and pick a pre-designed address label template to make it unique!


